MENU HERE
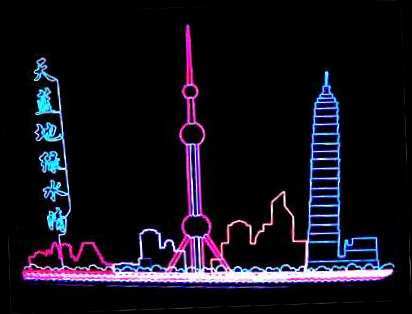
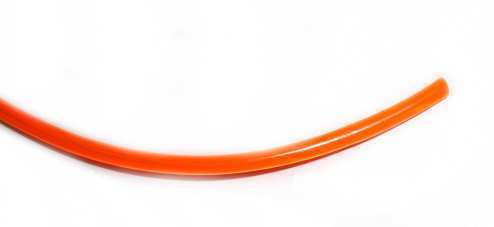
Flexible Neon Light Tubing
Flexible Neon Light Tubing
Great for Vehicles, Costumes, Advertising or Just Decoration
Now you Can Make Your Own Neon Signs & Bright Neon Decorations for a Fraction of the Cost!
IMPORTANT NOTE: There are no returns or exchanges accepted on Neon Tubing or Neon Tubing Products. All sales are final, and there are no exceptions. Please do not commit to purchase if you are not sure that you want the Neon Tubing Products.
WARNING:
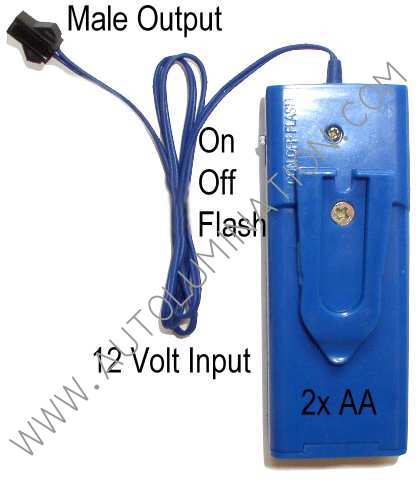
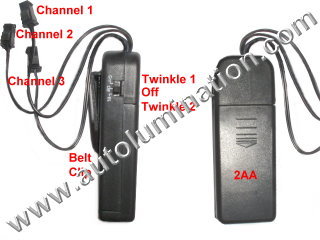
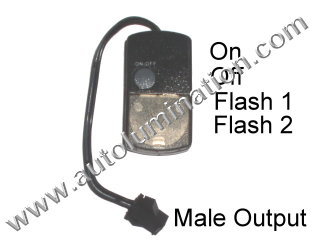
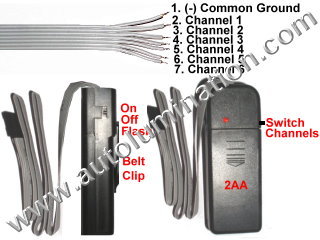
Flexible Neon Tubing is made to connect to special low voltage power sources
(Neon Drivers) as shown below only.
Never connect neon flexible tubing directly to any power source, using anything other than the appropriate
neon driver.
Never connect the neon wire directly to household current.
Never connect flexible neon tubing directly to
12 volt power sources, or automotive circuits, or any power source without the appropriate
drivers shown below.
Damage, electrical shock or fires can occur of the flexible neon wire is plugged directly into any non recommended power source.
The neon tubing is safe only if connected to the approved and recommended power sources
and drivers as described below.
Warning: Never switch power on any of the neon power supplies or drivers unless the Neon Wire is connected. The neon power board
in the driver will burn up if the neon wire is not connected before the power is switched on.
Power: Flexible neon tubing operates on high frequency current, and must be connected thru one of our neon power
drivers in order to light and to function properly.
A number of different connections are possible that allow the neon light tubes to light up solid, flash, and twinkle.
Power consumption for neon tubing is as follows:
1X tubing uses 0.10 amps for each 10 meter section (0.01 amps/Meter).
2X tubing uses 0.20 amps for each 10 meter section (0.02 amps/Meter).
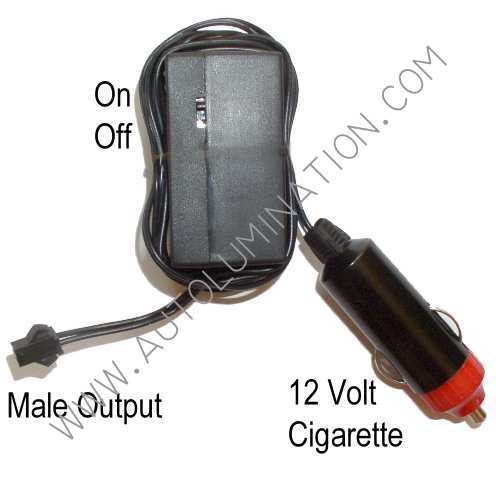
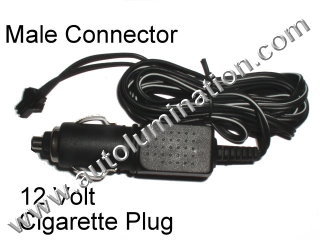
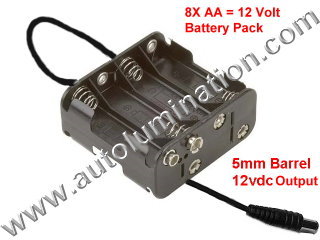
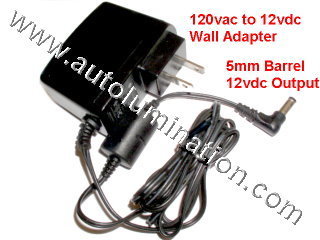
Flexible neon light tube drivers are available that can be powered using any 12 volt power source (such as a motorcycle, or automobile circuit, battery packs, or even ordinary 120 volt household current using our various power adapters
available here:
Click Here to Purchase Flexible Neon Light Drivers & Components
Typical Power Connections:
|
120 Volt Household Current:
|
|
1. 120 volt power adapter (DH100-12-1.5A) 12 volt output
-connects to- 12 Volt Neon Drivers
(DH5-12TB,
DH10-12TB, DH50-12TB or D2-12-C)
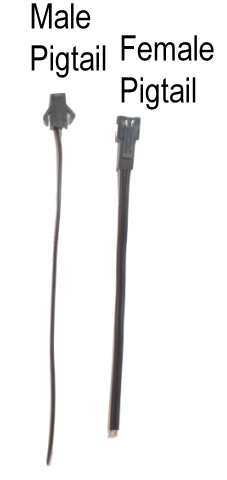
male plug -connects- to
female plug pigtail -connects- to neon tubing
|
|
|
|
|
|
|
|

|
|
2. 120 volt power adapter (DH100-12-1.5A) 12 volt output
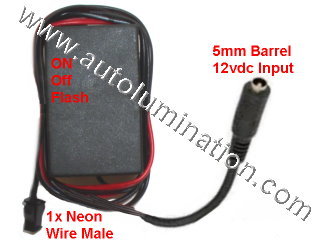
-connects to- Neon Driver
(NEON-DB10-12-3T-Jack)
male plugs -connect- to
female plug pigtail -connects- to neon tubing
|
|
|
 |
|
|
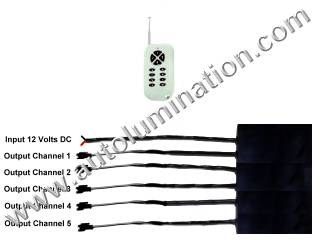
3. 120 volt power adapter (DH100-12-1.5A) 3volt output
-connects to- Neon Driver
(NEON-NT12V-RMT)
male plugs -connect- to
female plug pigtail -connects- to neon tubing
|
|
|
 |
 |
|
Flexible Neon Light Tubing
Instructions for Wire Preparation and Termination
|
A. Attachment Ideas:
The flexible neon tubing can be bent to any shape and can be attached to any surface that
does not get too hot (less than 150 F).
Plastic Sheet:
It is sometimes useful to attach the tubing to a surface such as clear plastic
Plexiglas or lexan sheets. This provides a means of anchoring the tubing to hold a shape and still allows the light to be seen thru a glass window from either side. Fish line, glue or tie wraps can be used to anchor to the flat plastic sheet. Small holes can be drilled to allow a loop to be formed with the fish line or tie wrap thru the plastic.
Tubing on Motorcycles ATV's and Bicycles:
It is common to wrap the neon tubing around the frame of a Motorcycles ATV's or bicycle. The ends can be fastened with a tie wrap.
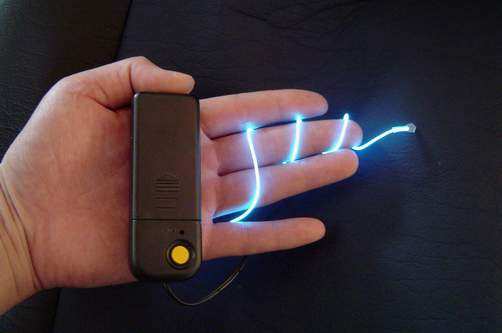
Clothing or Costumes:
The neon tubing can be attached using Velcro loops, or stitches around the tubing. Do not puncture the tubing during attachment.
Other interesting effect can be obtained using the neon wire for an
indirect lighting source thru a variety of transparent materials.
|
|
B. Wire Preparation & Termination:
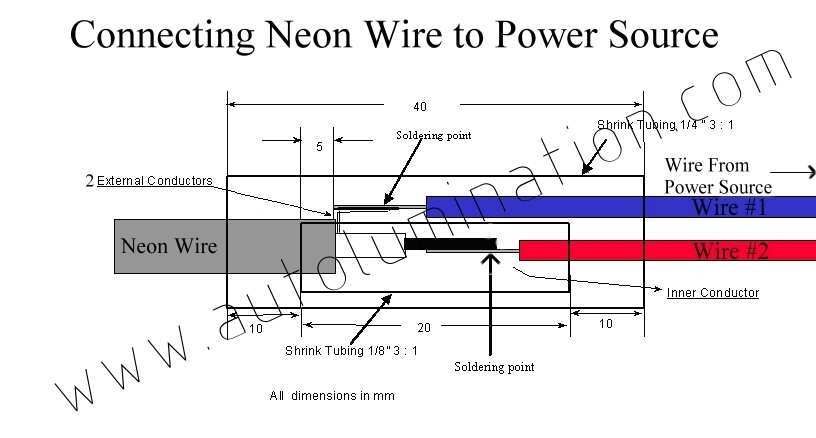
Recommended Tools:
Scissors.
Soldering Iron,
Heat Gun, Wire cutters, Exacto Knife or Hot Knife/hot tweezers, magnifying glass.
|
Step 1:
Cut tubing to length using scissors, wire cutters or and exacto knife.
Leave extra length in case you mess up the termination.
|
|
|
|
Step 2:
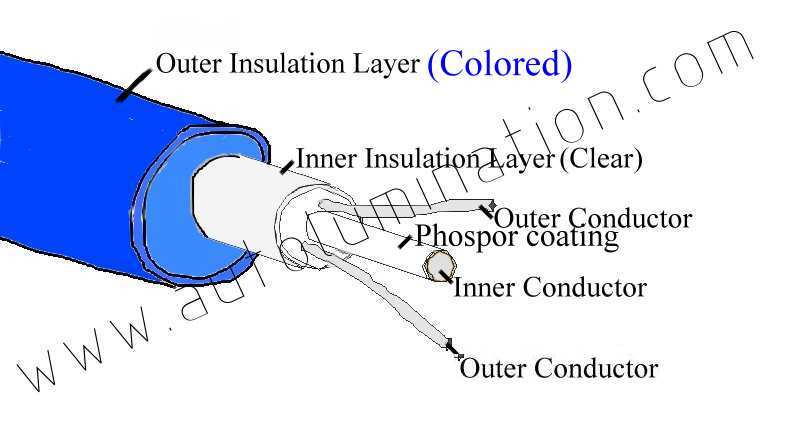
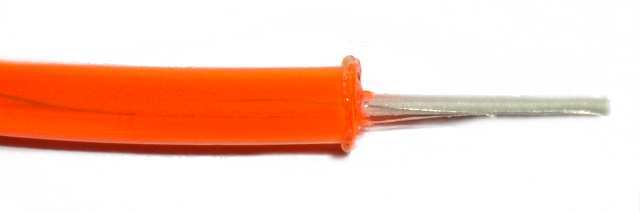
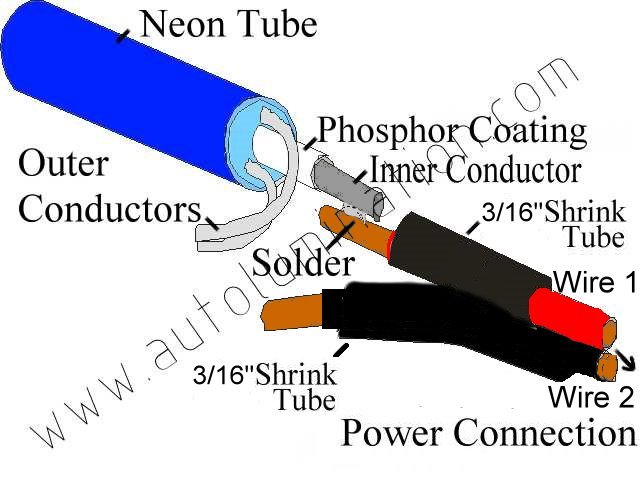
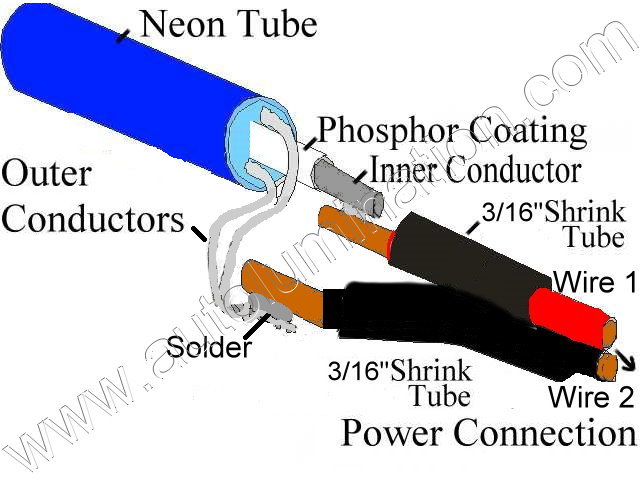
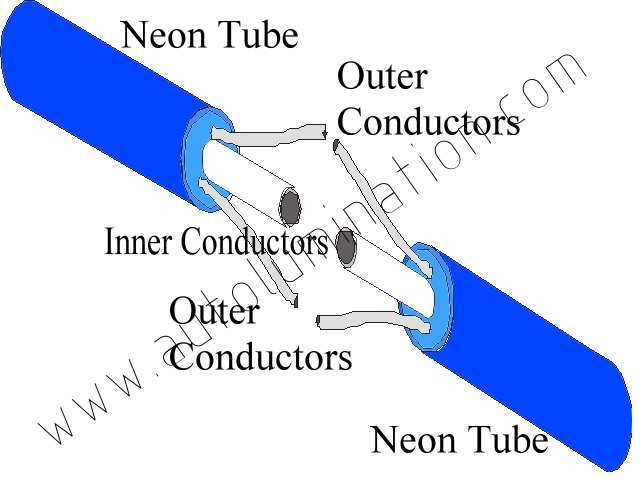
The neon tubing has 2 layers of insulation. The outer layer is colored and the inner layer is transparent.
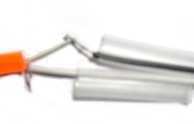
Using a hot knife, hot tweezers or an exacto knife, cut thru the
outer colored layer of insulation (approximately 20mm length) exposing the inner insulated bundle. This must be done carefully so that the inner insulation and delicate outer conductors inside the inner layer are not accidentally cut off.
If you accidentally cut off any of the conductors, start over.
|
|
Step 3:
Using a hot knife, hot tweezers or an exacto knife, cut thru the
inner transparent layer of insulation exposing the inner
conductor and two outer conductors (approximately 15-20mm
length). This must be done extremely carefully so that the outer conductors are not accidentally cut off. The
two outer conductors are extremely tiny, like a filament.
If you accidentally cut off any of the conductors, start over.
|
|
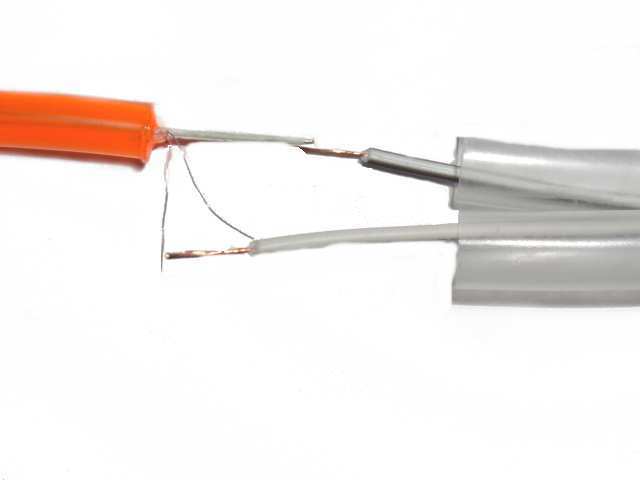
Step 4:
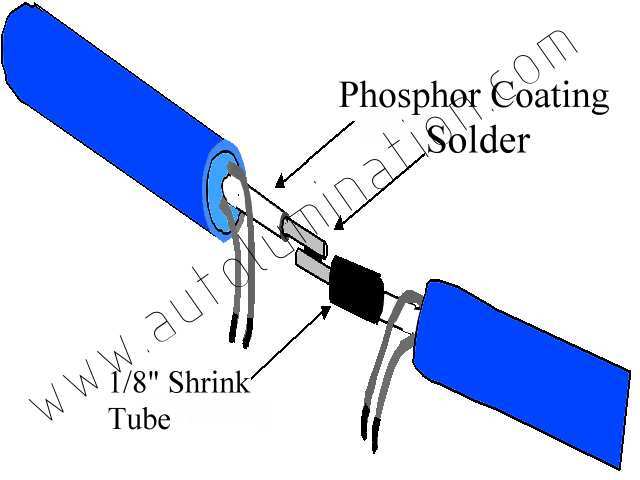
Using an exacto knife, scrape the white phosphor coating away off from the inner conductor exposing about 2-5mm of the
shiny metal inside the inner conductor. This will expose the metal of the inner conductor so it can be soldered to later.
|
|
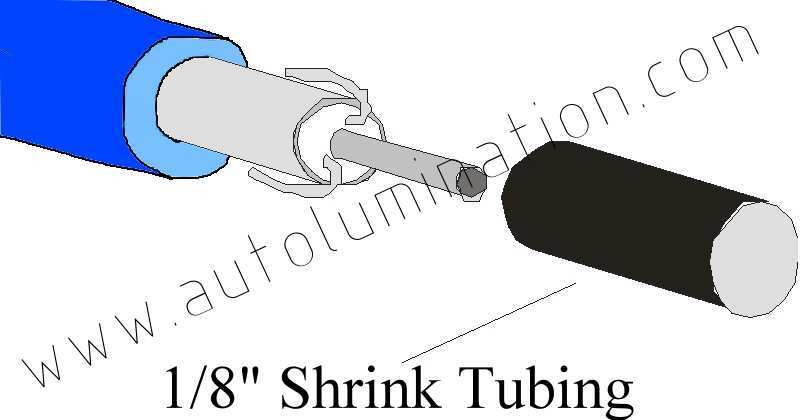
Step 5:
It is best to attach a pre-wired female pigtail connector to the neon tubing so that it can be easily connected and disconnected any time from the power source. Separate the two wires on the male pigtail to a distance of about 30mm from the end.
Strip the two wires from the pigtail connector exposing the copper wire about 5mm.
Cut two pieces of 3/64", 1/16" or 3/32" shrink tubing about 20mm-30mm long, and slide it over
both wires on the pigtail connector.
Pre-tin both wires on the pigtail connector with solder.
This will make it much easier to connect later.
|
|
Step 6:
Solder the inner conductor to one wire on the pigtail connector wire. (
NOTE: The neon tubing has no +/- polarity so it does not matter which wire connects to + or - )
|
|
Step 7:
Twist the two outer conductors together and then solder the outer conductors
to the other wire of the pigtail connector. (
NOTE: The neon wire has no +/- polarity so it does not matter which wire connects to + or - )
Slide both the shrink tubes over the soldered areas and shrink the tubing using a heat gun. (Note: Heat from the soldering iron or a candle can be used to shrink the tubing, if you do not have a heat gun if you are careful not turn melt the solder or the tubing.
|
|
Step 8:
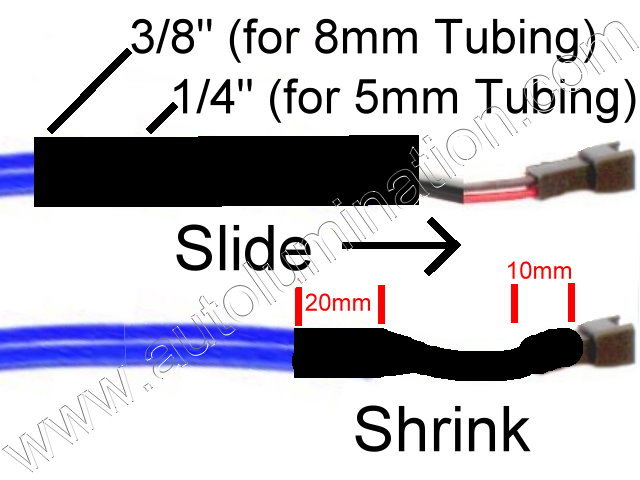
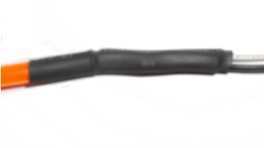
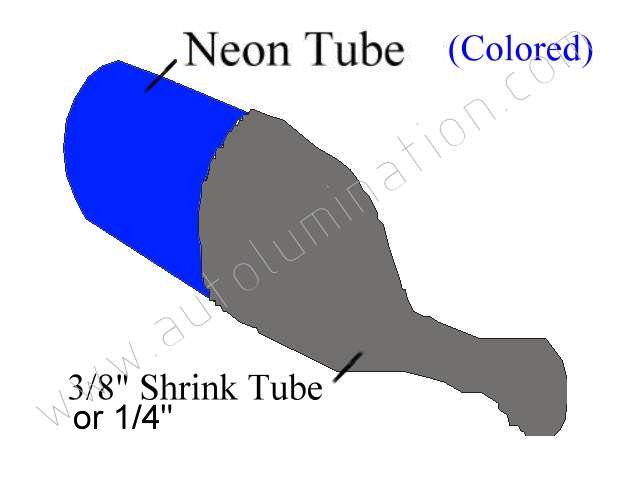
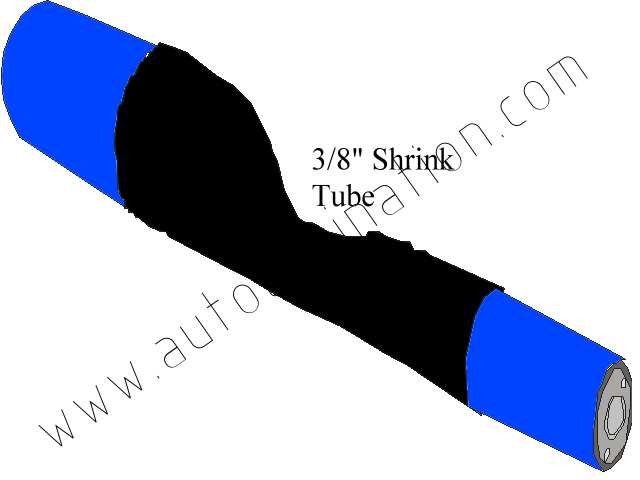
Cut a piece of 1/4" diameter shrink tubing (for 5mm tubing) or 3/8" diameter shrink tubing (for 8mm tubing) and slide it over the entire spliced area.
Slide the shrink tubing up over the connector stem. The
tubing should be long enough to overlap the neon tuning at least
20mm and also overlap the stem of the connector 10mm. Shrink the tubing using a heat gun. (Note: Heat from the soldering iron or a candle can be used to shrink the tubing, if you do not have a heat gun if you are careful not turn melt the solder or the tubing.
|
|
Step 9:
Test the neon tubing to make sure it lights. If it does not light, then one of the wires is not connected as described above, or the other end of the tubing may have the inner and outer conductors shorted together. You may have to re-terminate the neon tubing or dress the non terminated end to ensure that it is not shorted. After you ensure that the neon tubing is lighting, you can cut the non-terminated end of the tubing to the desired finished length. This end
can be terminated with shrink tubing to ensure that it does not short out. The inner and outer conductors on the non-terminated end must remain separated. This can be assured by stripping and
dressing the non-terminated end as shown in the images below:
Alternatively, you may dot the end with silicone after ensuring that the inner and outer conductors are not making contact and are separated.
|
|
|
C. Wire Preparation & Splicing Neon Tubing Together.
One or more sections of neon tubing can be connected and spliced together. It can be connected to the same or different colored neon tubing.
|
Step 1:
Cut tubing to length using scissors, wire cutters or and exacto knife.
Leave extra length in case you mess up the termination.
|
|
Step 2:
The neon tubing has 2 layers of insulation. The outer layer is colored and the inner layer is transparent.
Using a hot knife, hot tweezers or an exacto knife, cut thru the
outer colored layer of insulation (approximately 20mm length) exposing the inner insulated bundle. This must be done carefully so that the inner insulation and delicate outer conductors inside the inner layer are not accidentally cut off.
If you accidentally cut off any of the conductors, start over.
|
|
Step 3:
Using a hot knife, hot tweezers or an exacto knife, cut thru the
inner transparent layer of insulation exposing the inner
conductor and two outer conductors (approximately 15-20mm
length). This must be done extremely carefully so that the outer conductors are not accidentally cut off. The
two outer conductors are extremely tiny, like a filament.
If you accidentally cut off any of the conductors, start over.
|
|
Step 4:
Using an exacto knife, scrape the phosphor coating away off from the inner conductor exposing about 2-5mm of the
shiny metal inside the inner conductor on one end of each neon tubing to be spliced. This will expose the metal of the inner conductor so it can be soldered to later.
|
|
|
|
Step 5:
Cut a piece of 3/64", 1/16" or 3/32" shrink tubing about 10mm-20mm long, and slide it over one of the inner conductors out of the way so you can solder.
|
|
|
|
Step 6:
Solder the inner conductors together
. Slide the over the entire spliced area. Shrink the tubing using a heat gun. (Note: Heat from the soldering iron or a candle can be used to shrink the tubing, if you do not have a heat gun if you are careful not turn melt the solder or the tubing.
|
|
|
|
Step 7:
Twist the two outer conductors together and then solder the outer conductors together from each section of neon tubing
.
|

|
|
|
Step 8:
Cut a piece of 1/4" diameter shrink tubing (for 5mm tubing) or 3/8" diameter shrink tubing (for 8mm tubing) and slide it over the entire spliced area. Shrink the tubing using a heat gun. (Note: Heat from the soldering iron or a candle can be used to shrink the tubing, if you do not have a heat gun if you are careful not turn melt the solder or the tubing.
|
|
|
|
Step 9:
Test the neon tubing to make sure it lights. If it does not light, then one of the wires is not connected as described above, or the other end of the tubing may have the inner and outer conductors shorted together. You may have to re-terminate the neon tubing or dress the non terminated end to ensure that it is not shorted. After you ensure that the neon tubing is lighting, you can cut the non-terminated ends of the tubing to the desired finished length. This end should be terminated to ensure that it does not short out. The inner and outer conductors on the non-terminated end must remain separated. This can be assured by stripping and
dressing the non-terminated end as shown in the images below:
Alternatively, you may dot the end with silicone after ensuring that the inner and outer conductors are not making contact and are separated.
|
|

UPIC Shipping Insurance
Note: Our packages are not automatically insured against loss during shipping. Insurance is the responsibility of the purchaser!
$2.00 for each $100 unit of insurance
Shipping Insurance
$2.00 per $100
|
Links |
|
Automotive Replacement
Light Bulbs:
|
Other
Auto & Motorcycle Lighting:
|
Low Voltage Utility Lights
& Fixtures |
Truck 4X4 RV & Trailer Lighting |
Household, Commercial & Industrial Lighting |
Other Products |
Reference:
|
|
1156 1157 1142 2357 7507 7225
Bayonet Tail-Brake Turn Signal Back-Up |
LED Light Fixtures & Strobes
|
LED Light Fixtures & Strobes |
Semi, Truck & Truck Trailer
LEDS |
Lights For the Home, Yard &
Garden |
LED
Windshield Washer & Mirror Turn Signal Indicators |
Specs |
|
3157 3156 3457 4157 3057
Wedge Tail-Brake-Turn Signal & Back-Up Bulbs |
Light Bright NEON Glow Wire |
LED Strips, Led Strings. Led
Bars |
Clearance and Side Marker
Lights |
LED Strips, Led Strings. Led
Bars |
LED Flashers, Protectors, Load
Equalizers Turn Signal Fix |
Cross Reference
|
|
7443 7440 Wedge Tail-Brake-Turn Signal & Back-Up Bulbs |
LED
Neo-Neon Flexible NEON Light Tubing |
LED Strips Connectors,
Adapters & Mounting Hardware |
Tail Stop Work & Turn Signal
Lights |
MR11, MR16 GU10 Bulbs |
Electrical Contacts, Sockets,
Connectors & Fuses |
Technical Data
|
|
194 168 2825 W5W Wedge Side
Marker License Plate & Interior Bulbs |
HID
Headlight Fog Light & Reverse Light Systems |
Control Modules & Power Supplies |
Indicator Lights |
LED Light Fixtures for the Home &
RV |
Led Controllers, Flashing
Modules, Braker Modules & Dimmers |
Bulb Dimensions
|
|
37 74 Gauge & Instrument
Panel & Neo-Wedge Bulbs |
Daytime
Running Light (DRL) Kits and Fog Light Systems |
Overhead
& Under Cabinet Lighting _ Trucks - Boats & RV's |
Overhead
Cab Lighting
|
Track Lights |
Miniature Train Bulbs &
Parts |
General Bulb Information
|
|
3022 3122 561 578 6418 6411
Festoon Dome Bulbs |
LED Screw Mount Indicator &
Accent Lights |
LED Light Fixtures for the Home
Boat &
RV |
Daytime Running Light (DRL)
Kits and Fog Light Systems |
LED
Neo-Neon Flexible NEON Light Tubing |
Universal Programmable Remote
Controllers & Switches for Garage Door Openers |
Application Charts
|
|
Ba9s, E10, Ba7s, Small Ba15s
and Bay15d Bayonet Bulbs |
LED & Neon Light Tubes
& Underbody Light Kits |
LED Bike, Go Ped, Motorcycle,
ATV, Boat and RV Light Fixtures |
Connectors & Grommets |
LVD Electromagnetic Induction Bulbs |
Discrete
Raw Leds, Resistors & Components |
Bases & Filaments
|
|
<
906 921 Wedge Stop & Interior
Bulbs |
LED
Windshield Washer & Mirror Turn Signal Indicators |
LED Screw Mount Indicator &
Accent Lights |
|
|
Power Inverters - Power
Supplies - Power Adapters |
Led
Resistor Calculations |
|
Headlights DRL & Foglights |
Overhead
Cab Lighting |
|
|
|
LED Flashlights Work Lights &
Bulbs |
Shipping |
|
HID Systems |
Angel
Eye Halo Rings for Headlights Tail Lights & Lenses |
|
|
|
LED Bike, Go Ped, Motorcycle,
ATV, Boat and RV Light Fixtures |
Mail Orders |
|
6 Volt Antique - Vintage Bulbs &
24 volt |
LED
Flashing Dimming & Wig -Wag Modules |
|
|
|
Electrical Wire & Shrink Tubing |
International Shipping |
|
L1142
1076 1176 Boat & Marine Bulbs |
Power Inverters - Power
Supplies - Power Adapters |
|
|
|
Motorcycle & RV Running
Lights, Turn Signals & Indicator Lights |
FAQ'S |
|
Dura Chrome Titanium Platinum Silver Vision Bulbs |
Switchback Bulbs Two-Color
Turn Signal Running Lights |
|
|
|
Air Horns |
Policies |
|
Xenon Plasma Super Hyper White Bulbs |
|
|
|
|
Vinyl Protective Film for
Tinting Headlights, Tail Lights & Lenses |
Visual Bulb Finder |
|
G4 T10 2 Pin Bi- Pin |
|
|
|
|
Vinyl 3D Carbon Fiber
Decorative Self-Adhesive Film |
Lookup Order & Tracking
Number |
|
|
|
|
|
|
|
Sitemap |
|
Canbus
Error Free Bulbs BMW Mercedes Audi VW Volvo Dodge 5002S PY24W |
|
|
|
|
|
|
|
Weekly
Sale Items
|
CarInfoTech |
|
|
|
|
|