| Home |

|
Email: superlumination@cox.net |
 |
|
|
MENU HERE
Hi- I will send the correct item to you. When you receive it, please swap the Incorrect Items back into the Same Box for Return. Cross out the shipping address on the box, and mark "Return to Sender" clearly across the address label, and drop it into the Mail. US Postal will return it to us at our expense. Thank you- Sorry for the issue.
Hello - Thank you for ordering. This is a listing with multiple selection options. I noticed you selected xxxxx only. You did not order the complete harness. Unfortunately, we have many issues with customers who do not read the listing or pay attention when placing their orders, so not we are forced to explain and verify each order before we can ship. Before we ship, please confirm back that you understand what you ordered.
Thank you-
Sorry for the delay and inconvenience.
______________________________________________
HI- Sorry, I do not know. Please check the part numbers and images shown in the ebay listing carefully. Or if you can send me a clear image showing the face of your connector and I can check that for you.
______________________________________________
Hello -
Most of our inventory of these items burned up in the CA fires. We have limited
stock left here in AZ. Here are options:
1)
We can partially ship your order and refund the stock we do not have.
3
sets silver
1
set Black
2)
We can refund you entire order.
3) We can subsitute a comparable bulb
Please message me back which option is best for you.
We
are very sorry for this.
Thank you-
Chris--
HI-
Those bulbs use a circuit board style base which is very rigid and has no springiness in it. What happens often is that the contact in the socket get a preset from the original bulbs and do not have enough tension to grip the PCB style bulbs tightly. If you have twist lock sockets you can replace them with new ones that spring enough to grip the PCB style base.
Alternately, you can adjust the contacts inside the socket using small screwdriver:
Remove the bulb,
Using small screw driver and bend the contacts outward so that they will grip
the rigid PCB base more tightly.
Be sure that the power is off before inserting a screw driver or any metal
object into the socket or you will burn it up.
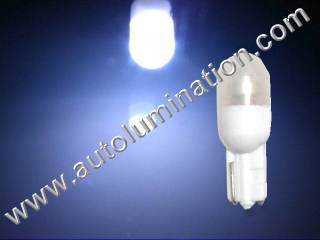
The other alternative is to use a #24 bulb which has the plastic base with the wire contacts which will have more springiness and may fit the socket like the original glass bulbs. This would be like the #24 Superstar
Image:
http://www.autolumination.com/images/auto_bulbs/24_3s_w_wm.jpg
If your bulb is not lighting, it is due to one or more of these reasons:
A. The bulb and/or twist lock base is inserted backwards.
To fix it: Remove the bulb, rotate 180 degrees and reinsert.
B. The contacts on the bulb are not making solid electrical contact with the contacts in the socket.
To Fix It: Remove the bulb, inspect and adjust contact as needed and reinsert.
C. There is no power going to the bulb socket.
To Fix It: Relocate the bulb to a socket that is presently working with another similar bulb. Retest the socket using a known good bulb. Be sure to check for A and B while moving bulbs.
D. The #74 PCB style bulbs must be inserted so that the bulb is centered in twist lock base. If the bulb is no centered it will not make electrical contact on one side and will not light. Please look at this image:
http://www.autolumination.com/images/auto_bulbs/74_installed_wrong_wm.jpg
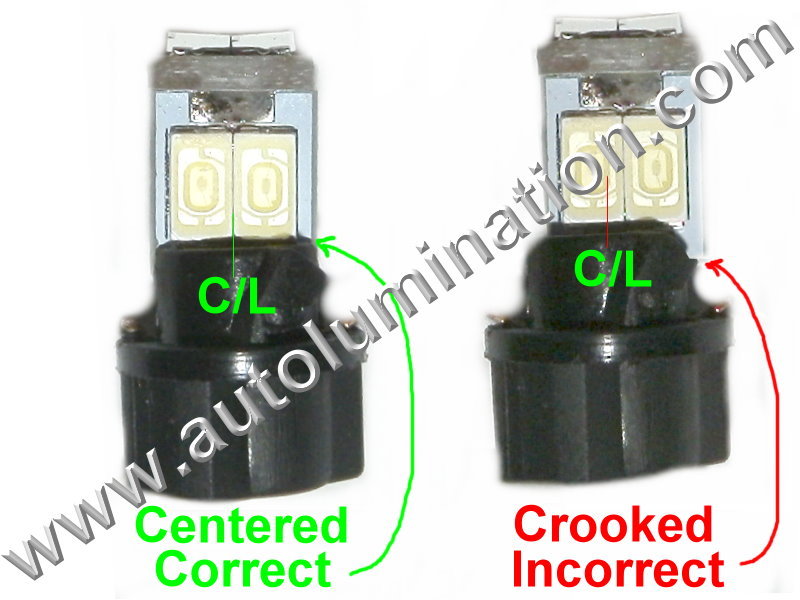
You can always test just the bulb using two wire leads connected direct to battery. This eliminates the problems associated with the circuit and just tests the bulb directly.
____________________________
If you cannot fit the led into the twist lock base, you may have the bulb oriented wrong. Rotate the bulb 90 degrees and reinsert.
In order to speed up delivery please specify bulb type(s), quantity and color(s) along with your payment.
You can pay using Paypal (
baconcc@yahoo.com), or mail payment to:
Chris Bacon
PO Box 1642
Higley, AZ 85236-1642
______________________________________________________________
You can pay using your credit card or debit card from the link in the email:
From the email Click On:
-
PAY
-
PAY WITH MY CREDIT CARD OR DEBIT CARD
______________________________________________________________
Hi-
If your credit card will not process, you have one or more of these issues:
1. The Billing Name, Expiration Date and CVC number must match exactly as printed on the card.
2. The Billing Address and zipcode entered must match exactly as it appears on the Credit Card Bill.
It may be easier to process the order from one or the other of our alternate sites:
C) www.superbrightbulbs.com
_____________________________________________________________
I think that is the type B
neowedge bulb on this page:
http://www.autolumination.com/74.htm
Scroll down the page and
find this image:
http://www.autolumination.com/images/auto_bulbs/neowedge_b_dims_wm.jpg
_____________________________________________________________
Hi-
White leds will vary in color slightly due to many factors. All of our super/cool white leds are set to light in the
~7000K range on this scale when powered at 12 volts, 35C, no lens cover, white background, measured from straight ahead, 0 degrees.
http://superlumination.com/images/auto_bulbs/kelvin_color_wm.jpg
White led bulbs will never match perfectly. Here is why:
Voltage, temperature, viewing angle, reflections from nearby objects, lens covers and human
perceptions all effect the perceived color of white light.
The human eye can detect differences in up to 100 different shades of white between 6500K and 7500K.
A change in voltage of +/- 1 volt can alter the color of a white led bulb +/- 200K.
A change in viewing angle of +/- 10 degrees can alter the color of a white led bulb +/- 100K.
A change in temperature of +/- 10 degrees C can alter the color of a white led bulb +/- 100K.
Reflections from nearby objects can alter the color of a white led bulb +/- 1000K.
Lens covers can alter the color of a white led bulb +/- 2000K.
Human perceptions can vary from person to person by up to +/- 2000K.
_______________________________________________________________
The simplest and fastest way is to reorder what you need, and then send the other items back for a refund.
Please use the RMA form here (RMA # 03-15-12-CB):
http://www.autolumination.com/policy_return.htm
Please be sure to note on the RMA form the date of the new purchase to avoid the restocking charges.
Please mail back what you would like to return in a box via regular first class postal mail, with a print of this email to:
Ctlumination - Exchanges
PO Box 1009
Topanga, CA 90290
Ctlumination – Returns
PO Box 1009
Topanga, CA 90290
___________________
Ctlumination - Exchanges
PO Box 1642
Higley, AZ 85236-1642
Ctlumination – Returns
PO Box 1642
Higley, AZ 85236-1642
___________________
Ctlumination - Exchanges
PO Box 306
Clarklake, MI 49234
Ctlumination – Returns
PO Box 306
Clarklake, MI 49234
___________________________________
With many flashers, led bulbs will cause the turns signals to flash rapidly, or not flash at all.
If using led bulbs for turn signal applications, or in vehicles with bulb-out warning systems, like
Audi, Volvo, Mercedes, BMW, VW and others, you may need to add load equalizers.
For led turn signals, you can change the flasher out using one of our new patented combination led/oem bulb flashers if we have one that fits your vehicle.
Unfortunately, there are no application charts for the flashers.
The simplest way is to match the blades of the one you have to the images on the web page to see if we have one that matches. You can find the flasher by switching on the turn signals and finding where the clicking sound is coming from.
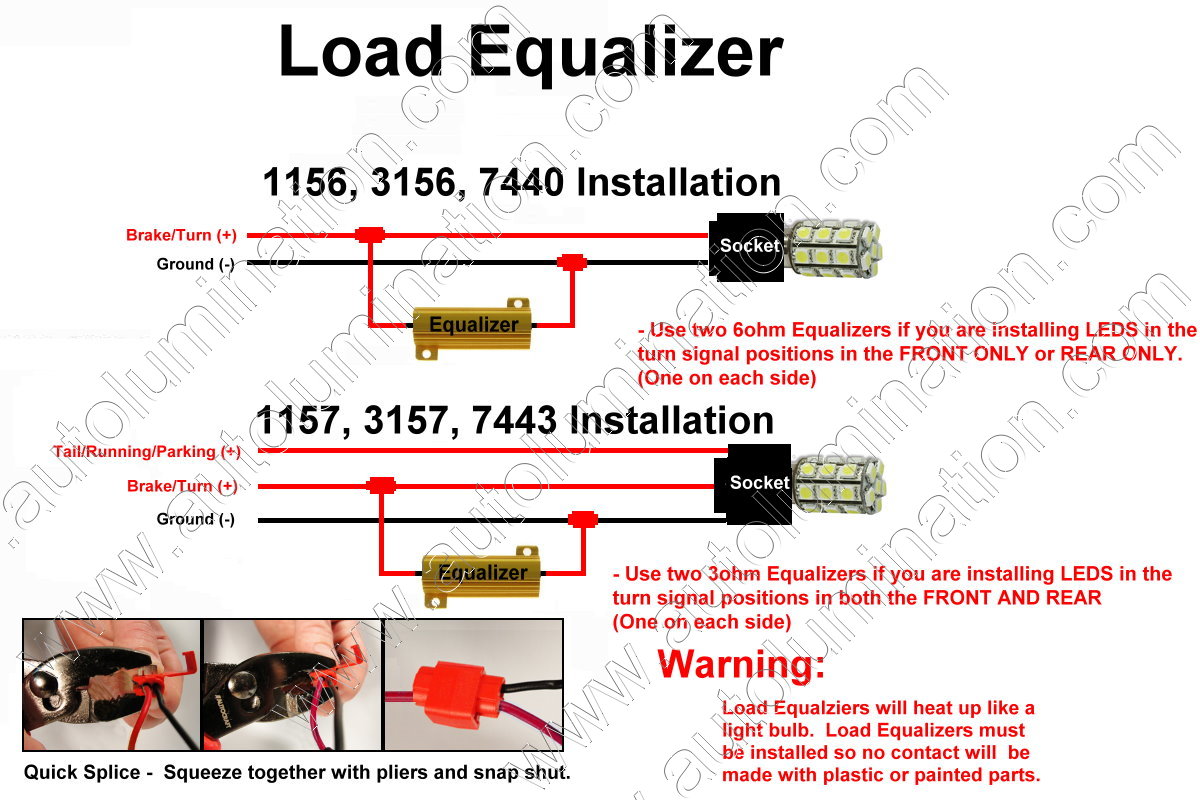
If we do not have an led flasher that matches, use one 6 ohm load equalizer installed across the - ground wire and the + turn signal wire feeding each led bulb.
More details on led flashers and load equalizers can be found at:
Use two 6 ohm equalizers for two front, or two rear led turn signal bulbs.
If you have four led turn signal bulbs in the front or rear, use two 3 ohm and position the load equalizer across the wire that feeds both bulbs. In some cases, if the front and read turn signal bulbs are powered from the same circuit, one 3 ohm on each side will take care of two led turn signal bulbs, one front and one rear. The only way to know is to try it and see.
One 6 ohm at each led turn signal bulb always will work though.
Place one load equalizer at each led turn signal bulb.
More details on led flashers and load equalizers can be found at:
http://www.autolumination.com/equalizers.htm
50 watt operate the most hot
75 watt operate less hot
100 watt operate the least hot
If your vehicle is equipped with an electronic bulb-out warning system, then any led bulb used in a bulb position that is monitored by the electronic bulb-out warning system will likely trigger an electronic bulb-out warning.
Not all bulbs are monitored by the electronic bulb-out warning systems. To test to see if a bulb is monitored by an electronic bulb-out system, you can remove the bulb to see if you get a warning,
To stop the electronic bulb-out warnings, install a load equalizer across the + and - wires that feed each led bulb that is causing an electronic bulb-out warning. Use one 6 ohm at each led bulb
Alternatively, we do have bulbs that contain special "canbus circuitry". The "canbus circuitry" is designed to eliminate most electronic bulb-out warnings in BMW. Mercedes, Audi. VW, Volvo and most others.
Our canbus bulbs are on this page:
http://www.autolumination.com/canbus.htm
Electronic bulb-out warnings and turn signal flashing/speed issues are not the same issue. Each must be addressed separately. Unfortunately, the circuitry required to correct the turn signal issues is too bulky to fit inside those bulbs, so the load equalizers or led flashers are still the only solution.
More details on led flashers and load equalizers can be found at:
http://www.autolumination.com/equalizers.htm
HEY- THE NEW LED TURN SIGNAL BULB YOU SENT ME IS DEFECTIVE. IT DOES'NT FLASH!
The flashing function in a vehicle is not built into the light bulbs themselves. As an example if you take your existing turn
signal bulbs and plug them into the reverse light position, they will not flash.
The bulb used in the turn signal just
reacts to the power being sent from the vehicle circuit. The bulb just lights when the circuit is energized and goes dim when the
circuit is de-energized.
The car has a control device called a flasher which is supposed to make the turn signal circuit
switch on and off when the turn signal is switched on.
If the bulb is not flashing, then it is a circuit/flasher issue that must be addressed when you switch to led bulbs.
This is often the case when you install led bulbs into a vehicle
____________________________
Hi-
If your bulb is not lighting, it is due to one or more of these reasons:
A. The bulb is inserted backwards.
To fix it: Remove the bulb, rotate 180 degrees and reinsert.
B. The contacts on the bulb are not making solid electrical contact with the contacts in the socket.
To Fix It: Remove the bulb, inspect and adjust contact as needed and reinsert.
C. There is no power going to the bulb socket.
To Fix It: Relocate the bulb to a socket that is presently working with another similar bulb. Retest the socket using a known good bulb. Be sure to check for A and B while moving bulbs.
You can always test just the bulb using two wire leads connected direct to battery. This eliminates the problems associated with the circuit and just tests the bulb directly.
____________________________
The reverse lights are designed for signaling other drivers , they are not designed for lighting up the roadway and driving around in reverse for long distances. Those bulbs are very small and is not going to operate like a headlight bulb. Reverse light housings are not parabolic/projection style housings and do not project light like a headlight housing.
For reverse light bulbs, we recommend the new 5 Watt Cree bulbs on this page:
http://www.autolumination.com/906.htm
http://www.autolumination.com/1156_1157.htm
http://www.autolumination.com/7443_7440.htm
http://www.autolumination.com/3157_3156.htm
Shining bright white lights out the rear of a vehicle
on the roadway is extremely hazardous and confuses other drivers. If you need to
travel great distances backwards, it is best to turn the vehicle around so it is
facing in the direction of travel.
For off-road use, you need to
add auxiliary lights like this:
http://www.autolumination.com/images/auto_bulbs/work_light_24w_square_wm.jpg
Here are all of the bulbs for
the F150:
http://www.carinfotech.com/details/automotive-bulbs-ford-f150-2009.htm
The more expensive 3156 led
bulbs are the brightest ones made:
http://www.autolumination.com/906.htm
http://www.autolumination.com/1156_1157.htm
http://www.autolumination.com/7443_7440.htm
http://www.autolumination.com/3157_3156.htm
_______________________________________________________________
I will send out a new one. When you receive it, please place the other item in the same box. Write "RETURN TO SENDER" boldly across the front of the box and send the box back in the mail. The post office will return the box to the return address for free.
_______________________________________________________________
Hi-
First, please try swapping the bulbs to the opposite sides to see if that fixes the problem.
There may just be a fuse blown, so you can try inserting the glass bulbs to verify that they still light.
The bulbs may simply be inserted backwards, so please remove the bulb, rotate 180 degrees and reinsert.
If you have a voltage meter, please check the voltage at the sockets to verify that there is at least 12 volts at the bulb socket.
_______________________________________________________________
Hi-
The gauge and instrument panel lights are not shown in the application charts, so the only way to identify them and to get an exact account, is to remove the bulbs and compare them to the images on the website.
These are commonly used gauge and instrument panel bulbs:
194:
http://www.autolumination.com/194.htm
Miniature bayonet:
http://www.autolumination.com/otherleds.htm
Other small bulbs:
http://www.autolumination.com/74.htm
Visual Bulb Finder Page:
http://www.autolumination.com/visual_bulb_finder.html
If you are not able to identify the bulbs from the images on the website, if you can remove the bulb and take a picture of it and email it to me, I can identify it for you.
To take a clear photo, lay the bulb on a table or flat surface. Set the camera to the "flower" (close-up) setting. Be sure to keep the camera at last 12" away from the object, so it can focus. Set the flash to "On" to make it flash.
Place a coin next to the bulb for size reference.
_______________________________________________________________
Hi-
You can order right from the website using paypal or a credit card.
Here are detailed instructions on how to pay using a credit card:
http://www.autolumination.com/credit_cards.htm
There are several shipping options available. After add the items to you shopping cart, you can proceed to checkout where you can view all of the shipping options, shipping times and costs before you complete your order and commit to pay.
Here are S&H costs for the US:
http://www.autolumination.com/menu/us_shipping.gif
Here are S&H costs for international orders:
http://www.autolumination.com/menu/international_shipping.gif
Here are S&H costs for Canada:
______________________________________________________________
We have emailed you and communicated this to you several times already.
Thank you for the prompt payment on my ebay auction.
Before we can ship, we need to know what color bulbs you want.
Please email us back your color selection.
Chris—
PS: Visit our website at:
www.autolumination.com
We are not able to accept credit cards over the phone. In fact, that is the least secure way to place an online order.
For a 100% guaranteed safe, secure transaction you can order right from the website using paypal or a credit card.
The Truth About Credit Card Theft and Using Credits Cards Online
Ordering online yourself is by far the safest way in which to use a credit card. In fact, ordering online is the only 100% safe and secure means to use a credit card.
99.99% of all credit card theft happens not online, but rather during conventional use of credit cards. The thief may later use your card information for online purchases, but that is not where the credit card information was obtained or stolen.
Credit card information is usually stolen by store clerks, cashiers, waiters/waitresses, telephone order clerks or acquaintances who have access to your actual card or if your purse/wallet is lost/stolen. This is very easy to do, they rarely get caught and never get prosecuted. This is why they do it and why it is so common.
Here is how Credit Card information is usually stolen
1. Hand your card to a store clerk or cashier. The clerk or cashier jots down a few numbers and other information and then uses that information to make purchases. Often to cover their trail, they even share it with others.
2. Hand your card to a waiter or waitress. The waiter or waitress disappears with your card. The waiter or waitress or anyone in the bar or restaurant jots down a few numbers and other information and then uses that information to make purchases. Often to cover their trail, they even share it with others.
3. Leave your purse or wallet lying about the house. Houseguests or anyone visiting simple jots down a few numbers and other information and then uses that information to make purchases. Often to cover their trail, they even share it with others.
4. Hand your card to a gas station attendant while you pump gas. The attendant jots down a few numbers and other information and then uses that information to make purchases. Often to cover their trail, they even share it with others.
Handing your credit card or credit card information over to anyone exposes you to the potential for credit card information theft, yet people do this every day.
Ordering online and following a few simple guidelines, produces zero risk for credit card information theft, yet some people are under the false impression otherwise.
Ordering from our website is 100% encrypted and no credit card information is retained. Your credit card is 100% secure, as long as you do not leave the information in your computer cache that someone else can access from the actual computer that you use.
Credit card information is rarely stolen online. This is highly unlikely, and virtually impossible if you ordered from an SSL payment screen (beginning with the HTTPS://). This is because all SSL secured sites are closely monitored by a private agency which is overseen by the Federal Government. Any credit card fraud being committed by an owner of an SSL secured site will be spotted very fast. The site will be shut down instantly and the owner of that site will be arrested and prosecuted in Federal Court. Prosecution is fast, simple and effective as all events and flows of money are 100% recorded on computer records. There is no hiding or covering of the facts.
SSL approved sites are screened regularly for strict compliance and if found to not comply with a very strict set of rules , they are forced into compliance within 90 days or are shut down. No stores, restaurants or conventional businesses have this level of scrutiny with 100% electronic surveillance.
Stealing credit card information over an SSL encrypted online payment screen on a secure network is 100% impossible.
The only way to steal CC information online is:
1. The card user enters CC information on a non SSL page (does not begin with HTTPS://........)
2. The card user enters CC information on a computer and later somebody accesses that computer and sees the screen or CC information in the computer memory cache.
3. The card user is connected to a non protected wireless network and a nearby (extremely sophisticated) hacker intercepts the CC information as it is being typed into your computer. This would require an almost impossible degree of sophisticated equipment and software and only happens in large cities where many unsecured wireless connections can be intercepted from one location at one time. Also, you must be using a non-secured wireless internet connection.
4. The card user unknowingly enters CC information while an onlooker is watching or allows somebody access to their credit card or credit card information.
Here are simple questions to ask yourself:
1. Are you using a computer that others have access to?
2. Are you using an unsecured wireless Internet connection?
3. Are you entering CC information onto a non SSL screen (No HTTPS://)?
4. Do you allow others to see or handle your credit card or credit card information?
If you did not do any of the above, then your CC information was not stolen online.
_______________________________________________________________
Automotive circuits often do not behave in the same manner when the led bulbs are installed as they might with glass bulbs installed. For this reason, testing led bulbs by plugging them into a circuit is not an effective testing method to determine if the problem is actually with the led bulb or with the circuit.
The only effective way to test the led bulb is by using two test wires connected direct to a fully charged 12 volt battery or other known 12 volt power supply. This will assure that 12 volts are reaching the led circuits. For dual circuit bulbs, each circuit must be tested independently using the test leads.
LED Bulb wiring diagrams:
http://www.autolumination.com/installation.html
Common problems with using led bulbs in automotive circuits are:
1. The turn signal circuit will not switch on power to the led bulb due to the low current draw.
FIX: Test each circuit to see if there is 12+ volts at the socket when the bulb is removed. Install an LED Flasher or Load Equalizer to make the circuit switch on power.
2. The turn signal circuit will not flash or will flash rapidly with the led bulb installed due to the low current draw.
FIX: Test each circuit to see if there is 12+ volts at the socket when the bulb is removed. Install an LED Flasher or Load Equalizer to make the circuit switch on power.
3. Other circuits may not switch on power to the led bulb due to the low current draw.
FIX: Test the circuit to see if there is power flashing properly to the socket when the bulb is removed. Install a Load Equalizer to make the circuit switch on power.
4. led bulbs can be inserted backwards.
FIX: Remove the led bulb, rotate 180 degrees and reinsert.
5. Some of all led bulbs in a bulb may not light or will not stay lit if the connection is loose.
FIX: Remove the led bulb, adjust the contacts to assure a tight electrical connection. Reinsert the led bulb.
6. Fuses can pop if the circuit is shorted by any metal object or debris.
FIX: Test the circuit using a voltage meter to see if there is 12+ volts at the socket. Install the original glass bulb to verify that the fuse has not popped. Replace the fuse if necessary and avoid crossing any metal object across the socket contacts.
7. Some circuits may be wired wring or backwards for the led bulbs. This is most common for the 3157, 7443 and Ba9s led bulbs.
FIX: Test the circuit using a voltage meter to see which wires are:
+ bright
+ dim
- ground
Ensure that the corresponding wires are contacting the corresponding contacts on the bulbs. One or more wires may need to be swapped to make them all line up properly.
LED Bulb wiring diagrams:
http://www.autolumination.com/installation.html
_______________________________________________________________
Hi-
I think that one or both equalizers are either on the wrong wires or not making proper electrical connections.
Try this:
1. Switch on the headlights. Touch the equalizers and verify that they are cool to the touch.
2. Switch on the left turn signals. Verify that the left equalizers heat up hot, like a light bulb.
If the equalizers heat up when the headlights are on and the turn signals are off, then they are on the wrong wires. They need to be across the - ground wire and + bright wire.
If the equalizers do not heat up when the turn signals are switched on, then they are either on the wrong wires, or you have a bad electrical connection on one or both ends.
For turn signal led bulbs, the equalizer must be spliced across the - ground wire and the + turn signal wire feeding each led bulb.
For best results, match the led color to the lens color (ie: use red led bulbs in red lenses, amber led bulbs in amber lenses and white led bulbs in clear lenses.
Led brightness and performance will vary depending on the housing and lens design. led bulbs are not always brighter than stock glass bulbs. For best performance in most housings, use the tower style led bulbs.
led bulbs are preferred ,mainly for the vivid colors, low current draw (power consumption 90% less than glass bulbs) and instant on capability. The instant on and off capability can be quite dramatic at highway speeds for brake and turn signal detection at higher speeds.
Check here for the stopping distance comparisons for led bulbs compared to incandescent bulbs:
http://www2.wwnorton.com/college/chemistry/chemconnections/BlueLight/pages/hp/an1155-3.pdf
We also have a new led braker module to help make the brake lights more visible. These can only be used with led bulbs. Please check them out here:
http://www.autolumination.com/braker_installation.html
_______________________________________________________________
Hi-
There are several causes of voltage related failures on led bulbs. Some vehicles chronically cause premature led failures. This is normally related to excess voltage, voltage spikes, high levels of AC current being generated from the alternator, or excessive ambient heat. While glass bulbs are slow to react to rapid surges, led bulbs can be destroyed in milliseconds from a sudden spike or chronic high voltage, or excessive AC current from an alternator that has one or more burned out diodes. Additionally, led bulbs should only be used in areas where the ambient temperature is less than 150F.
If the bulbs are being used in DRL positions, especially GM DRL's, we highly recommend using only our patented 30 led SMT, 20 led tower II or 48 led SMT bulbs in combination with an led protector. If these precautions are not taken, the led bulbs will fail prematurely in most DRL applications.
If the bulbs are being used in gauges with a dimmer, always set the dimmer to 80% or less. This minor adjustment will make the
led bulbs last ten times as long in some vehicles with chronic voltage issues.
If the bulbs are being used in an application with no dimmer, we have a new led protector that can be spliced into the + wire to protect against minor voltage surges. These work great in vehicles that have high voltage, or are prone to voltage surges. They can also help protect the
led bulbs from:
1. Switching on the ignition & starting the engine.
2. Changing or disconnecting the battery.
3. Charging the battery with an auxiliary battery charger, or revving the engine hard with a weak or dead battery.
4. Using jumper cables.
These are +$1.99 each, and can be purchased from the Load Equalizer page here :
http://www.autolumination.com/equalizers.htm
http://superlumination.com/images/auto_bulbs/led_protector_wm.jpg
For added protection, always look for the bulbs with our patented circuitry under this symbol:
http://superlumination.com/images/auto_bulbs/patent_wm.jpg
This circuitry will prevent overdriving the led bulbs and assures consistent color when using multiple bulbs or led bulbs with multiple led bulbs on the bulb.
If you will do a posting on the forum, we can offer you a 10% discount on
your next order.
To use the coupon, be sure to order from this link/website:
www.superlumination.com
Use coupon code:
sept10perc when you checkout.
_______________________________________________________________________________________________________________________________________________________________
More LED's = more light output.
However, no LED's will produce as much total light output as incandescent bulbs.
________________________________________________________________
You can return them. There is a 20% restocking/retesting fee on all electrical returns.
Please use the RMA form here (RMA # 2010-1-CB):
http://www.autolumination.com/policy_return.htm
Please mail it them back in a box via regular postal mail, with a print of this email:
Ctlumination – Returns
PO Box 1642
Higley, AZ 85236-1642
Ctlumination – Returns
PO Box 306
Clarklake, MI 49234
________________________________________________________________
You can return them. There is a 20% restocking/retesting fee on all electrical returns for refunds. All items must be received in as-new condition in order to receive the refund or exchange.
Please use the RMA form here (RMA # 2010-1-CB):
http://www.autolumination.com/policy_return.htm
Any items may be exchange and will be credited at 100% of value, but the S&H charges for reshipping back to your will be charged. All items must be received back in as-new condition in order to receive credit.
A print of this email must be sent along with the returns in order to receive a refund or exchange.
Please mail it them back in a box via regular postal mail, with a print of this email:
Ctlumination – Returns
PO Box 306
Clarklake, MI 49234
Ctlumination – Returns
PO Box 1642
Higley, AZ 85236-1642
__________________________________________________________________
The 1157 3157 & 7443 led bulbs have dual circuits. Bright for braking/turn signals and dim for running lights. All
leds light up in both bright and dim mode.
Led performance depends on the lens and housing design. For best results in most lenses and housings, use the SMT tower style led bulbs.
More leds = more light output, but no led bulbs produce as much total 360 degree light output as incandescent bulbs.
With led bulbs you need to be sure to switch the lights off when:
1. Switching on the ignition & starting the engine.
2. Changing or disconnecting the battery.
3. Charging the battery with an auxiliary battery charger.
4. Using jumper cables.
___________________________________________________________________
There are 3 wires to each led bulb:
1. - ground
2. + bright
3. + dim
The equalizers must be across the - ground and + bright.
How are you identifying the + bright wire?
The problem is one of 3 things:
1. A bad electrical connection on one or both ends of the equalizers.
2. The equalizers are installed across the wrong wires.
3. In some instances, the front and rear turn signal bulbs are monitored separately by the flasher and one 6 ohm must be placed at each led bulb.
Tests:
1. Switch on the headlights with the turn signals off. Check the equalizers to see if they stay cool to the touch. If the equalizers are hot with the headlights on and the turn signals off, then they are on the wrong + wire.
2. Switch the right hand turn signals on. The equalizer on the right hand side should heat up hot like a light bulb. If it doe not heat up when the turn signal is switched on, then either it is on the wrong wire(s), or there is a bad electrical connection on one or both ends.
3. If the equalizers stay cool to the touch when the headlights are switched on and the turn signals are off and heat up when the turn signals are switched on, then you will need to use one 6 ohm at each led bulb. You can verify this by putting the oem glass bulbs back in the front and only using the
led bulbs in the rear (or wherever the equalizers are installed front or rear). If everything works with this configuration, then you will need one 6 ohm equalizer at each led turn signal bulb.
For turn signal led bulbs, the equalizer must be spliced across the - ground wire and the + turn signal wire feeding each led bulb.
___________________________________________________________________
The bulbs that are blowing fuses may require a CK led. You can use the led bulbs you have, but you would have to rearrange the wires to match the contacts on the bulb.
Here is a diagram of the CK led and the regular 3157 led:
http://www.autolumination.com/3157_led_selection_troubleshooting.html
http://www.autolumination.com/conversion.html
What is happening is that the two common ground wires are shorting across either the + dim circuit, or the + bright circuit.
There are 3 wires to each led bulb:
1. - ground
2. + bright
3. + dim
There are 4 contacts to each conventionally wired 3157 led:
1. - ground
2. + bright
3. + dim
4. - ground
What you need in order for the led bulbs to work is to match each wire to the corresponding lead on the led. You can identify the two common - ground leads using an ohmmeter or perhaps visually (they are connected together inside the bulb housing). Once you identify the two common - ground leads, the other leads on the bulb can be identified from the diagram above.
The wires can also be identified using an multi-meter:
The - ground wires is common to any metal chassis ground on the vehicle.
The + bright wire will have full voltage when the turn signal or brakes are applied.
The + dim leads will have full voltage when the headlights are switched on.
For turn signal led bulbs, the equalizer must be spliced across the - ground wire and the + turn signal wire feeding each led bulb.
___________________________________________________________________
There are no application charts for the flashers.
The simplest way is to match the blades of the one you have to the images on the web page to see if we have one that matches. You can find the flasher by switching on the turn signals and finding where the clicking sound is coming from.
If we do not have an led flasher that matches, use one 6 ohm load equalizer installed across the - ground wire and the + turn signal wire feeding each led bulb.
More details on load equalizers can be found at:
http://www.autolumination.com/equalizers.htm
If we do not have one that matches but you have 3 wires to your flasher, you can wire to any one of the 3 blade flashers.
The 3 wires are:
1. +battery
2. - ground
3. + load
You will have to determine which wire is which. You can see which blade on the 3 blade flashers is which from the diagrams here:
___________________________________________________________________
Some automotive circuits send a trickle of current thru the circuit even when the circuit is "off". This trickle of current is not enough power to light a filament bulb so it is just drained off as heat. It will light an led though. The current is not enough to drain the battery. It can be corrected by installing one 100 ohm load equalizer across the circuit at each bulb that is lit. This will drain off the power before it reached the led bulbs just like the filament bulbs do.
The 100 ohm are here:
http://www.autolumination.com/equalizers.htm
___________________________________________________________________
Some automotive circuits will not energize the circuit, or pulse current to the bulbs to check to see if the bulb is burned out. Since the led bulbs draw 90% less power than the glass bulbs, these circuits will not stay on when the led bulb is inserted. It can be corrected by installing one 15 ohm load equalizer across the circuit at each led bulb bulb. This will add more load to the circuit and make the power stay on.
The 15 ohm are here:
http://www.autolumination.com/equalizers.htm
Hello-
Thank you for the order. It has shipped via US postal service.
We have prepared an installation and troubleshooting guide to assist in led bulb installations.
led bulbs, like any electronics, must be used properly in order to make them last.
We have prepared some important tips on how to properly use your led bulbs to protect your investment & make them last.
If you ordered led bulbs, please take time to read this over before your led bulbs arrive.
http://www.autolumination.com/installation.html
If you ordered a programmable remote garage opener, you will need the special programming instructions found here:
http://spectrumled.com/remote.html
.................and be sure to visit our website again soon at:
www.autolumination.com
General
Our bulbs are all tested prior to shipment. If your led bulb is not lighting at all, chances are that the polarity is reversed, proper electrical contact is not being made in the socket, or the circuit is not getting electrical power (ie: broken wire, blown fuse, etc.. To reverse the polarity, remove the bulb, rotate the bulb 180 degrees and reinsert.
All of the automotive led bulbs that we sell can be powered directly with 6-15 volts of ac or dc power. A couple of wire leads connected directly to your battery or any 6-15 volt power source can be used to check and troubleshoot your bulbs. If the bulb does not light, reverse the polarity immediately. Although reversed polarity should not damage our bulbs for short durations (due to the special circuitry installed in each bulb), prolonged connection with improper polarity can cause permanent damage to the led bulb. Note:
Do not try to increase the voltage of your voltage regulator, or try other tricks to increase voltage feeding the led bulbs. The led bulbs are very sensitive to voltage spikes and will be destroyed by higher voltage.
You cannot connect these bulbs to higher voltage power sources such as household current. This will immediately destroy the led bulb.
If installing multiple led bulbs in a vehicle, always install only one led bulb at a time. Many automotive circuits are quite complex and will react to changes such as missing bulbs, changes in resistance and bad connections in various ways. An improper installation in on one bulb can affect other bulbs in your car. If you start indiscriminatingly yanking bulbs out and putting in led bulbs all over the car, without verifying proper installation and function, you will likely have many hours of aggravation trying to figure out what is going on.
Always follow these simple steps when changing out bulbs:
-
If possible, verify that the present bulb is working properly first.
-
Remove only one bulb from the vehicle.
-
Install the led bulb.
-
Briefly test the circuit by applying power, (ie: turn on switch/ignition, apply brake, activate turn signal, etc…) If the led bulb does not light immediately, cut power to the circuit immediately by turning off the switch/ignition, releasing the brake, switching off the turn signal, etc…)
-
With many led bulbs (plastic wedge style and festoons style), the bulbs can be inserted 2 ways. If the bulb does not light, cut power immediately. Remove the bulb from the socket. Rotate the bulb 180 degrees and reinsert.
-
Proceed to removing/installing the next bulb only after the first bulb position is operating properly.
Terminology:
Polarity: Polarity refers to the +/- (positive and negative) side of a circuit. The electrical contact points on an led bulb must be connected to the appropriate + or – side of the circuit or wire
Filament:
The small wire inside all incandescent light bulbs that glows when power is applied.
Incandescent bulb:
Any light bulb that used a glowing filament in order to produce light. If you look closely at an incandescent bulb, you can see the filament. If the filament is broken or a gap exists, the bulb is burned out and will not light. An incandescent bulb can be tested with an ohmmeter to determine is there is electrical continuity and resistance across the filament.
led bulb Bulb:
Light Emitting Diode bulbs use a special element that produces light as result of current flowing across two specially formulated elements. LED bulbs have no filament and the +/- side of the bulb are not connected. There is a gap between these +/- elements. This is why the led bulb has no resistance and cannot be continuity tested with an ohmmeter. If you look closely at the led element, you can see the elements and the gap. This gap is normal and does not mean that the led bulb is burned out. LED bulbs are all clear in color until they are lit up.
1157
The 1157 bulb installation is quite simple, however there are a few issues you may encounter with 1157 led bulbs.
The 1157 is a dual contact (d.c.) bulb. The dual contacts are connected to 2 separate circuits inside the bulb. One for bright (braking/turn signals) and one for dim (running/parking lights).
The 1157 led bulb, like all led bulbs, must have the proper polarity in order to light up in a DC (battery powered) circuit. The 1157 should have negative contact on the outer metal shell of the bulb and positive contact on one of the bottom contact points. All factory wired cars are already wired this way, but custom or modified circuits may be wired backwards since the polarity does not matter for an incandescent light to function.
You will notice that the 1157 has 2 pins on the sides. These pins are indexed so that the bulb can only be installed one way. Make sure you are inserting the bulb so that the lower indexed pin aligns with the corresponding lower slot in the socket. This will guarantee proper polarity unless the socket is wired improperly.
Once in awhile, factory circuits (or repaired vehicles) are wired improperly with the wrong polarity. This will result in the 1157 led bulb not lighting. Before suspecting improper polarity, all other possibilities should be eliminated first. Polarity is best measured with a voltage meter, but if you are inventive there are many other ways to verify proper polarity in the 1157 socket.
1156
The 1156 bulb installation is quite simple, however there are a few issues you may encounter with 1156 led bulbs.
The 1156 is a single contact (s.c.) bulb. The 1156 led bulb, like all led bulbs, must have the proper polarity in order to light up in a DC (battery powered) circuit. The 1156 should have negative contact on the outer metal shell of the bulb and positive contact on the bottom of the bulb. All factory wired cars are already wired this way, but custom or modified circuits may be wired backwards since the polarity does not matter for an incandescent light to function.
You will notice that the 1156 has 2 pins on the sides. These pins are non-indexed so that the bulb can be inserted either way. This bulb socket is designed to guarantee proper polarity unless the socket is wired improperly.
Once in awhile, factory circuits (or repaired vehicles) are wired improperly with the wrong polarity. This will result in the 1156 led bulb not lighting. Before suspecting improper polarity, all other possibilities should be eliminated first. Polarity is best measured with a voltage meter, but if you are inventive there are many other ways to verify proper polarity in the 1156 socket.
Note: There are many 1157, 3157, and 7443 led (dual circuit) bulbs being sold that do not have diodes installed in them and /or have the diodes installed improperly. Without properly installed diodes, the dual circuit led bulbs will produce a bleed voltage across the unused circuit that can cause malfunction in many vehicles. All dual circuit led bulbs that we sell have the diodes properly installed to prevent these issues. This can be tested with a power supply and voltage meter. If you suspect that you may have purchased some dual circuit led bulbs from another supplier with this problem, you may email me for further instructions on how to test to see if this is the problem.
Turn Signal & Bulb-Out Warnings System Problems (Load Equalizers ) :
The 1157, 3157 and 7443 are often used in turn signal applications. Some vehicles have circuitry installed in their turn signal wiring that senses resistance across each turn signal bulb to determine if the bulb filament has burned out. In many vehicles, these systems warn the driver of the burned out bulb by causing a rapid flashing of the turn signals, or in some circuits not flashing the turn signals and instead producing a steady-on condition.
In a few cases, the bulb-out warning systems will not allow power to flow thru the circuit, causing the led bulb to not light up (This is common in many BMW, Mercedes and vehicles with dash mounted bulb-out warning systems).
This can be corrected by installing Load Equalizers in each turn signal position where an led bulb has been used to replace and incandescent bulb.
The load resistor simulates the resistance of the incandescent bulb and restores the turn signal to normal operating function with the led bulb.
We have 6 ohm Load Equalizers and 3 ohm Load Equalizers .
The 6 ohm load equalizers will handle only one led bulb. If you are installing led bulbs in the front or rear turn signals only, you will need (2) , 6 ohm Load Equalizers ....one on each side.
The 3 ohm load equalizers will handle up to two led bulbs on the same circuit. If you are installing led bulbs in both the front and rear, you will need (2), 3 ohm Load Equalizers ....one on each side. The 3 ohm Load Equalizers can be installed in the front or rear.
3157
The 3157 is the most complex automotive bulb and circuit to understand. The 3157 is a dual contact (d.c.) bulb. The dual contacts are connected to 2 separate circuits inside the bulb. One for bright (braking/turn signals) and one for dim (running/parking lights).
The 3157 has four separate wire contacts protruding from the bottom. If you examine the bulb closely, you can see that two of the wire contacts connect to the same point inside the bulb. These two contacts are the common negative (-) grounds.
The remaining two contacts are the positive (+) side of the circuit; bright (braking/turn signals) and dim (running/parking lights).
You will notice that the 3157 has no orientation features and can be inserted 2 different ways by rotating the bulb 180 degrees. In order for the bulb to light, the bulb must be inserted so that the 2 common negative contacts are connected to the negative leads in the socket.
It is best to determine which contacts are (+) and (-) using a meter, however if this is not practical, the bulb may be briefly inserted to see if it lights. If it does not light, the power should be cut ASAP to avoid damaging the bulb and/or blowing fuses. The bulb should be removed, rotated 180 degrees and reinserted before reapplying power to the bulb. As always, only remove/install one bulb at a time to avoid compounding issues.
If the bulb still will not light, then it is most likely not getting power due to poor electrical contact or a possible blown fuse. The old incandescent bulb can be reinserted anytime to verify that the socket is receiving power.
The 3157 led bulb, like all led bulbs, must have the proper polarity in order to light up in a DC (battery powered) circuit. Most factory wired cars are already wired so that the bulb will properly connect, but only if the bulb is oriented properly.
Custom or modified circuits and a few factory wired vehicles may be wired backwards and or cross-wired, since the polarity does not matter for an incandescent light to function. Mis-wired sockets can also cause dim and bright circuits to operate inversely (in this rare case, the contacts on the bulb can be modified to compensate).
Once in awhile, factory circuits (or repaired vehicles) are wired improperly. This will result in the 3157 led bulb dim and bright circuits to operate inversely and or can cause the led bulb to blow fuses no mater which way it is inserted (in this rare case, the contacts on the bulb can be modified to compensate).
Before suspecting improper wiring, all other possibilities should be eliminated first. Improper wiring is best measured with a multi-meter, but if you are inventive there are many other ways to verify proper wiring in the 3157 sockets. Be aware that turn signal circuits are not simple circuits and that expected voltage readings may not appear even in a properly wired circuits especially if any bulbs are removed.
Some vehicles requires specially wired 3157 CK LED bulbs.
Note: Use Special 3157-SRCK (Red) or SACK (Amber) bulbs to replace the center tail lamp bulbs on:
-
88-99 (Old Body Style) Chevy and GMC full size trucks & SUVs.
-
95-01 Cavalier and Sunfire tail lamp bulbs
-
92-98 Grand Am tail lamp bulbs
and Toyota Tundra front turn signals
Use the regular 3157 bulbs for the top tail lamp bulb on:
-
88-99 (Old Body Style) Chevy and GMC full size trucks & SUVs.
-
95-01 Cavalier and Sunfire tail lamp bulbs
-
92-98 Grand Am tail lamp bulbs
CLICK HERE TO >> ORDER SPECIALLY WIRED SRCK & SACK BULBS
3156
The 3156 is a single contact (s.c.) bulb. The 3157 led bulb can be used universally in either 3157 or 3156 applications. We usually ship 3157 bulbs for all 3157 and 3156 orders to provide the greatest flexibility of application for the user.
The 3156 has two separate wire contacts protruding from the bottom. One of these two contacts is the common negative (-) ground. The remaining contact is the positive (+) side of the circuit. The 3157 extra contacts don’t connect to anything in the 3156 socket and the bulb will light high beam only.
When installing the 3156 or 3157 you will notice there is no orientation features and it can be inserted 2 different ways by rotating the bulb 180 degrees. In order for the bulb to light, the bulb must be inserted so that the common negative contact is connected to the negative lead in the socket.
It is best to determine which contacts are (+) and (-) using a meter, however if this is not practical, the bulb may be briefly inserted to see if it lights. If it does not light, the power should be cut ASAP to avoid damaging the bulb and/or blowing fuses. The bulb should be removed, rotated 180 degrees and reinserted before reapplying power to the bulb. As always, only remove/install one bulb at a time to avoid compounding issues.
If the bulb still will not light, then it is most likely not getting power due to poor electrical contact or a possible blown fuse. The old incandescent bulb can be reinserted anytime to verify that the socket is receiving power.
The 3156/3157 led bulb, like all led bulbs, must have the proper polarity in order to light up in a DC (battery powered) circuit. All factory wired cars are already wired so that the bulb will properly connect, but only if the bulb is oriented properly.
7443
The 7443 one of the more complex automotive bulbs and circuits to understand. The 7443 is a dual contact (d.c.) bulb. The dual contacts are connected to 2 separate circuits inside the bulb. One for bright (braking/turn signals) and one for dim (running/parking lights).
The 7443 has four separate wire contacts protruding from the bottom. If you examine the bulb closely, you can see that two of the wire contacts connect to the same point inside the bulb. These two contacts are the common negative (-) grounds.
The remaining two contacts are the positive (+) side of the circuit; bright (braking/turn signals) and dim (running/parking lights).
You will notice that the 7443 has no orientation features and can be inserted 2 different ways by rotating the bulb 180 degrees. In order for the bulb to light, the bulb must be inserted so that the 2 common negative contacts are connected to the negative leads in the socket.
It is best to determine which contacts are (+) and (-) using a meter, however if this is not practical, the bulb may be briefly inserted to see if it lights. If it does not light, the power should be cut ASAP to avoid damaging the bulb and/or blowing fuses. The bulb should be removed, rotated 180 degrees and reinserted before reapplying power to the bulb. As always, only remove/install one bulb at a time to avoid compounding issues.
If the bulb still will not light, then it is most likely not getting power due to poor electrical contact or a possible blown fuse. The old incandescent bulb can be reinserted anytime to verify that the socket is receiving power.
The 7443 led bulb, like all led bulbs, must have the proper polarity in order to light up in a DC (battery powered) circuit. All factory wired cars are already wired so that the bulb will properly connect, but only if the bulb is oriented properly.
Custom or modified circuits may be wired backwards and or cross-wired, since the polarity does not matter for an incandescent light to function. Mis-wired sockets can also cause dim and bright circuits to operate inversely (in this rare case, the contacts on the bulb can be modified to compensate).
Once in awhile, factory circuits (or repaired vehicles) are wired improperly. This will result in the 7443 led bulb dim and bright circuits to operate inversely and or can cause the led bulb to blow fuses no mater which way it is inserted (in this rare case, the contacts on the bulb can be modified to compensate).
Before suspecting improper wiring, all other possibilities should be eliminated first. Improper wiring is best measured with a multi-meter, but if you are inventive there are many other ways to verify proper wiring in the 7443 sockets. Be aware that turn signal circuits are not simple circuits and that expected voltage readings may not appear even in a properly wired circuits especially if any bulbs are removed.
7440
The 7440 is a single contact (s.c.) bulb. The 7443 led bulb can be used universally in either 7443 or 7440 applications. We usually ship 7443 bulbs for all 7443 and 7440 orders to provide the greatest flexibility of application for the user.
The 7440 has two separate wire contacts protruding from the bottom. One of these two contacts is the common negative (-) ground. The remaining contact is the positive (+) side of the circuit. The 7443 extra contacts don’t connect to anything in the 7440 socket and the bulb will light high beam only.
When installing the 7440 or 7443 you will notice there is no orientation features and it can be inserted 2 different ways by rotating the bulb 180 degrees. In order for the bulb to light, the bulb must be inserted so that the common negative contact is connected to the negative lead in the socket.
It is best to determine which contacts are (+) and (-) using a meter, however if this is not practical, the bulb may be briefly inserted to see if it lights. If it does not light, the power should be cut ASAP to avoid damaging the bulb and/or blowing fuses. The bulb should be removed, rotated 180 degrees and reinserted before reapplying power to the bulb. As always, only remove/install one bulb at a time to avoid compounding issues.
If the bulb still will not light, then it is most likely not getting power due to poor electrical contact or a possible blown fuse. The old incandescent bulb can be reinserted anytime to verify that the socket is receiving power.
The 7440/7443 led bulb, like all led bulbs, must have the proper polarity in order to light up in a DC (battery powered) circuit. All factory wired cars are already wired so that the bulb will properly connect, but only if the bulb is oriented properly.
194 168 921 906 74 LED Wedge Bulbs
These bulbs are all quite simple to install. The 921/906/196/168 bulbs all have the same base and can be inserted in the same socket and used interchangeably as long as the bulb will physically fit in the space.
These all have two separate wire contacts protruding from the bottom. One of these two contacts is the common negative (-) ground. The remaining contact is the positive (+) side of the circuit.
When installing the bulbs you will notice there is no orientation features and they can be inserted 2 different ways by rotating the bulbs 180 degrees. In order for the bulbs to light, the bulbs must be inserted so that the common negative contact is connected to the negative lead in the socket.
It is best to determine which contacts are (+) and (-) using a meter, however if this is not practical, the bulb may be briefly inserted to see if it lights.
If it does not light, the bulb should be removed ASAP to avoid damaging the bulb and/or blowing fuses. Remove the bulb, rotated 180 degrees and reinserted before reapplying power to the bulb. As always, only remove/install one bulb at a time to avoid compounding issues.
If the bulb still will not light, then it is most likely not getting power due to poor electrical contact or a possible blown fuse. The old incandescent bulb can be reinserted anytime to verify that the socket is receiving power. The wire contacts also can be adjusted to get better contact.
These, like all led bulbs, must have the proper polarity in order to light up in a DC (battery powered) circuit. Most factory wired cars are already wired so that the bulb will properly connect, but only if the bulb is oriented properly.
In some cars, the small wedge base sockets have the contacts opposite so they won’t align with the bulb no mater how it is rotated. If the contacts on the bulb are on the wrong side to align with the socket, you can bend the wire contacts on the bulb around the base to the other side so that they align with the contacts in the socket. Caution should be exercised before bending the contacts to avoid having to bend them back and forth. The contacts are brittle and should only be re-bent one time to avoid breaking them off.
211 212 3022 3021, etc…Festoon Bulbs
These bulbs are all quite simple to install. The festoon bulbs all have the same cone shaped capped ends and only vary in length. They can often be used to replace the wire loop square capped end bulbs of similar design by tweaking the receptacle/socket. The length of the socket can also sometimes be tweaked to accept shorter or longer festoon bulbs.
The festoon bulbs all have two cone shaped end caps, one on either end of the bulb. One of these two contacts is the common negative (-) ground. The remaining contact is the positive (+) side of the circuit. These end caps are delicate and should not be rotated or twisted. Twisting the end caps will cause the wire lead to snap and the bulb will not light.
When installing the bulbs you will notice there is no orientation features and they can be inserted 2 different ways by rotating the bulbs 180 degrees. In order for the bulbs to light, the bulbs must be inserted so that the common negative contact is connected to the negative lead in the socket.
It is best to determine which contacts are (+) and (-) using a meter, however if this is not practical, the bulb may be briefly inserted to see if it lights.
If it does not light, the bulb should be removed ASAP to avoid damaging the bulb and/or blowing fuses. Remove the bulb, rotated 180 degrees and reinserted before reapplying power to the bulb. As always, only remove/install one bulb at a time to avoid compounding issues.
If the bulb still will not light, then it is most likely not getting power due to poor electrical contact or a possible blown fuse. The old incandescent bulb can be reinserted anytime to verify that the socket is receiving power. The wire contacts also can be adjusted to get better contact.
These, like all led bulbs, must have the proper polarity in order to light up in a DC (battery powered) circuit. Most factory wired cars are already wired so that the bulb will properly connect, but only if the bulb is oriented properly.
To find out if these bulbs will fit your vehicle..........
Click Here>> http://www.sylvania.com
Then go to: Automotive Replacement Guide - find the right light source for your vehicle

Standard Rates (US Only)
*Via US Postal First Class Mail
* Orders weighing more than 1 lb will ship via parcel post unless special shipping options are added (below).
Shipping & Handling
|
Total Order |
Cost |
| $.01-$9.99 | $3.50 |
| $10.00-$49.99 | $4.00 |
| $50.00-$99.99 | $5.00 |
| $100-$199.99 | $10.00 |
| $200+ | $15.00 |
*Note: If you do not add any special shipping options to your order, we will automatically ship via US postal first class mail.
You must choose a special shipping option (see below) in order to get a tracking number.
All International orders must choose an international shipping option.
![]()
![]()
![]()
UPIC Shipping Insurance
Just $1.30 for up to $100 of merchandise
For each $100 of Insurance
Note: Our packages are not automatically insured against loss during shipping. Insurance is the responsibility of the purchaser!
$1.30 for each $100 unit of insurance
Shipping Insurance
$2.00 per $100